Standard menus
Some menus and menu items appear so often in applications that their use and design can be standardized. Using standard menus will enhance the feeling of consistency across applications and help the user feel more comfortable with your program.
Listed below are standard menus that your application should use whenver appropriate. The order in which the menus and their items are presented is an important part of the specification.
Project Menu
Applications that create, edit and save data should have a Project menu. The Project menu should be the first menu on the left side of the menu bar and should contain as many of these items as [is] appropriate - in the order shown.
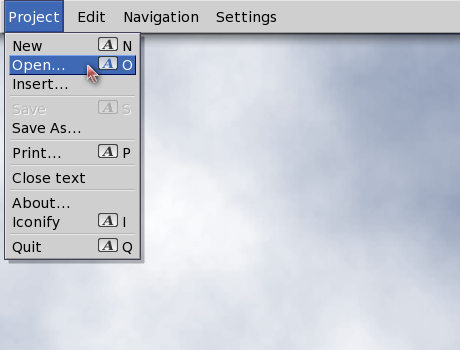
Fig. 6.6: The Project menu.
Print and Print As... are optional items for applications that support printing. Hide, Reveal... and Close are optional items for multiple-project applications. Exit [Level] is an option for multi-level programs.
New [Right-Amiga-N]
New should open a blank, untitled project.
Open... [Right-Amiga-O]
Open... should bring up a file requester.
If an unsaved project currently exists, the modified project requester (Save project?) should be brought up when Open... is selected - unless your application supports multiple projects.
Save [Right-Amiga-S]
If the project had been saved previously, Save should copy the current version over the old version.
If the project has never been saved, Save should bring up a file requester.
Save As... [Right-Amiga-A]
Save As... should bring up a file requester to prompt the user for a name, and then save the file.
Print [Right-Amiga-P]
Print should send the project to the printer using the currennt settings. The current settings may either be those found in Workbench's Prefs directory or individual program settings previously saved by the user.
Print As...
Print As... brings up a requester that can be used to set your progam's print options.
Hide
This menu item is for programs that can handle multiple projects at one time. Hide should remove a project's window from the screen. If the user selects Quit Program before returning to a hidden project that has unsaved changes, the modified project requester should come up asking if he wants to save the project first. A separate modified project requester should be presented for each unsaved, hidden project.
Reveal...
Reveal... is for programs that can handle multiple projects at one time. Reveal... should bring up a requester with a scrolling list gadget containing all opened projects whether hidden or not. Although its true purpose is to return hidden projects to the screen, it is more user-friendly to allow the user to view all open projects from this item. The chosen project's window should open an jump in fron of any other windows. If no projects are hidden, this item should be ghosted.
Hide, Reveal... and Close... are optional items for multi-project applications. Exit [Level] is an option for multi-level programs.
Close
This menu item is for programs that can handle multiple projects at one time. Close should remove the current project's window from the screen. If there are unsaved changes, a modified project requester should come up first.
About...
About... should bring up a window with information about your program and the current project. What information is included is up to you, but it should include at least the version number of your software. Some suggested information to provide: ARexx port name, project size, [and] tool name.
Exit [Level]
Exit [Level] should allow the user to leave the current level, such as the slide editing level in an electronic slide show program, and return to the next highest level. The word [Level] on the label can be replaced with the name of the current level.
Quit [Program]... [Right-Amiga-Q]
Quit [Program]... should exit the entire program. The word [Program] can be replaced by the name of your application.
A separate modified project requester should come up for any open or hidden projects with unsaved changes.
Quit [Program]... should not be modal; ie. it should be available at any level.
Edit Menu
Any application that can perform editing functions should have the Edit menu in the second position. The following items represent the suggested list with Redo as an optional item. A basic rule is that any menu item that operates on blocks of data should go in the Edit menu.
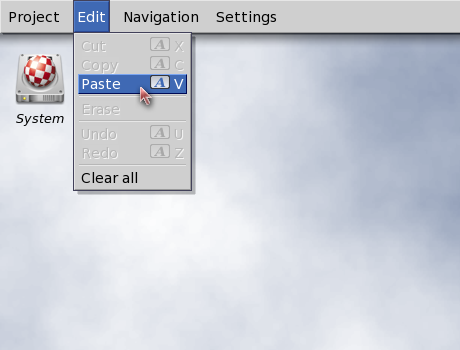
Fig. 6.7: The Edit menu.
You should support the Clipboard as your buffer for cut-and-paste operations. This will allow the user to share the clips between applications. See Chapter 11 for more information on the Clipboard.
Cut [Right-Amiga-X]
Cut should remove the highlighted text or current object and place it in the buffer.
Copy [Right-Amiga-C]
Copy should retain the highlighted text or current object in the project while also placing a duplicate of it in the buffer. The text should then be unhighlighted to show that the copy took place.
Paste [Right-Amiga-V]
Paste should take whatever is in the buffer and place it at the insertion point in the project window.
Erase
Erase should remove the highlighted text or current object.
Undo [Right-Amiga-Z]
Undo should restore the project to the state it was in before the user's last action. If, for instance, the user imported a text clip by mistake in a word processor, Undo should automatically take it out.
Some programs support multiple steps of Undo. Using the example in the previous paragraph, say the user had deleted a paragraph before inserting the text clip. Selecting Undo twice should take out the mistaken text clip and return his original paragraph.
Redo
Redo is an option for programs supporting multiple steps of Undo. In a program that doesn't support multiple steps of Undo, hitting Undo twice would take the user back to where he was before he selected Undo - it's cyclical. He imports a text clip, selects Undo and the text clip is gone. Select Undo again and the text clip is back again. In this program, Undo undoes Undo.
But in applications with multiple steps of Undo, the user can undo anything except Undo. He just keeps going back another step instead of going through cyclical actions. So Redo is there to undo any mistaken Undos.
Macros Menu
If your application supports macros, it should use ARexx, the Amiga's built-in scripting language, rather than its own internal scripting language. See Chapter 9 for more information on ARexx.
The Macros menu should allow the user to create and assign macros. Optionally, you can include the ability to load and save macros as well.
Fig. 6.8: The Macros menu.
Start Learning
When Start Learning is selected, all subsequent user actions should be written in ARexx script form to an internal buffer - until Stop Learning is selected.
Feedback to the user is essential, so it would be a good idea to let the user know that the Start Learning command was accepted. The indicated can be subtle but should be noticeable if the user wants to look for it. One idea is to put a small glyph, letter or word in the project's title bar.
Stop Learning
When Stop Learning is selected, your program should stop wrioting user actions to the internal buffer created by Start Learning.
Any visual feedback that originated with Start Learning should go away.
Assign Macro...
Assign Macro... should bring up a requester through which the user can assign the script created by the previous two commands.
Macros can be implemented [in] a number of ways. One longtime favourite is to assign the macro to the function keys, the ten keys across the top of the keyboard, or to some other keyboard combination. Or the Macro can be assigned to the User menu (see section later in tyhis chapter). Or the macro can be given a name and saved to disk; from there it can be implemented via an ARexx command console. Some programs may choose to support one, some or all of these methods. Your Assign Macro... requester should reflect all the possible choices your program supports.
Load...
Load... should bring up a requester listing the macros that can be loaded into memory. This, along with Save..., forms an optional set of items.
Save...
The macros design as discussed above assumes that key- and menu-activated macros will be assigned and used on a per-session basis. The next time the user returns to your program, the macros he had assigned to keys and menus will no longer exist.
Save... should allow the user to name a macro and save it to disk. At another session, the macro could be loaded and then assigned to a key or menu. This, along with Load..., forms an optional set of items.
Otherwise, if the user wishes to save the macros and their assigned positions, he should do it through the Save Settings item found in the Settings menu.
Settings Menu
Provide a Settings menu if you allow the user to change and save aspects of your program's environment. This menu should be located in the second position from the right.
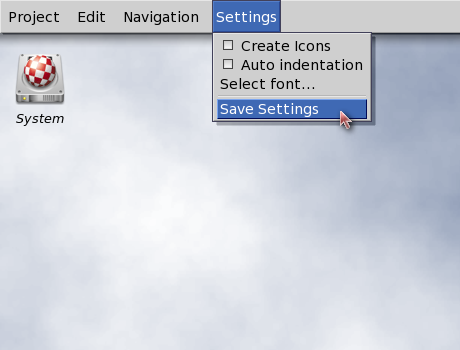
Fig. 6.9: The Settings menu.
Consult Chapter 12 for more information about preferences in general.
Two items should be accessible through this menu (if your program supports them): a toggle item asking if icons should be created and an overall Save Settings item. They may be directly in the menu or in a requester brought up by a menu item.
[options]
Listed in this menu should be any specific options you wish to handle through a menu item, such as what screen resolution to operate in or baud rate for a terminal package. Or you could have an option labelled Set Settings... that would bring up a control panel which could be used to set all the program's options.
[options] can be toggle items, or they can bring up submenus or requesters - it all depends on your application's needs.
Whatever these options are, they would change the user's preferences for that session only. To save them as defaults the user would have to use one of the Save Settings items.
Note: the word [option] shown here is only a placeholder to be replaced with a descriptive menu label.
Create Icons?
Create Icons? is a toggle item that should allow the user to choose whether a .info file will be created with each project. A .info file contains a graphic image for the file's icon. User's who don't use the GUI as a filing system may find .info files to be extraneous and a waste of storage space. Your program should provide this menu item.
Load Settings...
Load Settings... is an optional item that should allow the user to change from his current settings to a new set of previously-saved settings.
Load Settings... should be included if you think your users will want or need multiple settings files.
Save Settings
Save Settings should save the user's settings as your application's default preferences. Each time your application is opened thereafter, it should use these user-specified settings.
By default, Save Settings should save the new settings in the current settings file. See Chapter 12 for more information on saving settings files.
Save Settings As...
Save Settings As... is an optional item that brings up a file requester. Save Settings As... will be used when the user wishes to save multiple settings files.
There are a couple of reasons why this option may be helpful to users. A user may save different settings for different types of projects; eg. settings.vid for projects being output to video and settings.prt for projects being output to a printer. Also, if your application is being used on a network, users may wish to save personal settings.
User Menu
The User menu is a variable-length menu that contains user-defined macros and any other optional features a user may want to add as a menu item. This should be located at the far right.
Fig. 6.10: A sample User menu.